My Keurig died. Not quite, but it was sputtering and having difficult producing any caffeine laced liquor that my body was craving for. My morning coffee was going to have to wait until I could figure out how to clean it out… again. This wasn’t the first time something happened to the family’s K-cup brewer; several times we’ve had to unclog the needle, burp it or waive some kind of voodoo apparatus over it to get it working again. The brewer was convenient, but the little mishaps that would occur once or twice a month was getting annoying. I’ve wrote some blog entries regarding K-Cup coffees in an effort to catalog the ones that were of good quality but none of them really could compare to when I used to grind my own beans. After much thought I was determined to brew a better tasting cup of coffee than before – it was time for the return of freshly ground coffee!
The Mortal Instruments
There are several key pieces to brewing a good cup of coffee:
- Fresh Coffee Beans
- Burr Grinder
- Scale
- Water
- Brewing Apparatus
The Coffee Beans
Using fresh coffee beans is a no brainer. If I’m going to go through the effort in brewing a cup a coffee without the magical efficiency of the Keurig, I might as well make a superior cup of coffee. Kicking Horse Coffee is one of my preferred brands specifically “Kick Ass” or if I’m looking for a really full bodied, bold taste “454 Horse Power” is a good choice.
But how do you determine how fresh your beans are? This part is easy – just take a look at the bean and you should be able to tell.

The oilier the fresher the coffee bean.
The majority of the flavor is within the oil. As the beans are exposed to air, oxidization will occur and the drier they will become. This is why when you first open a package a beans you get a strong, pungent coffee aroma and by day 10 it’s practically missing. But if you just opened the bag and you’re staring at dried lumps take note and perhaps avoid purchasing that brand again. The shiny beans on the left is from the Bauer Bakery & Cafe. This Waterloo, Ontario cafe makes my favorite cup of coffee and I’m totally pleased that I could buy their beans. Great chocolate and caramel tones!
Burr Grinder

Source: Casa Brew
The Burr Grinder is a must have tool for getting the most out of your coffee. Why you ask? Don’t you just need to pulverize the beans and soak them in water? Well, yes and no. You see one of the factors that contribute to coffee’s bitterness is how much surface area of the grind you are exposing to the water. Too much you over extract the flavor compounds (bitter), too little you won’t get much taste at all. If you are using the typical blade grinder you can’t control the grind which means you can’t control the bitterness. Burr grinders give you the control, but don’t go all crazy and purchase something from Italy. I use the President’s Choice Precision Burr Grinder which costs about $30.
Scale
Precise measurement plays an important role for the best coffee you can make at home. The main issue I have with pod coffee makers is if you want a larger cup of coffee you’re really just pouring more water through it and diluting the drink. When the manufacture says 8oz, you don’t really have a choice if you want to get the ideal cup out of the pod. By measuring the amount of coffee to the amount of water you get to figure out how strong and how large a cup you wish to make.
A cheap digital scale is all you really need. I find that the ratio is 20 grams of beans with 360ml of water.
Water
Water makes a big difference to the quality of your drink, even using a pod maker. Use filtered water, ’nuff said.
Brewing Apparatus
This was the most tricky part. Before trying out the Keurig, I used to have a Bunn coffee maker and it was fantastic! It kept the water at the ideal brewing temperature (200 degrees F) and it made a pot in 4 minutes. Notice I said “pot”. That was the biggest issue – most days I just need one cup. So off I went to researching different brewing devices.
You’ll notice that I didn’t test a French Press coffee maker. The reason for this is that in the past I found that too much grit ended up at the bottom of my cup. Getting a mouthful of grounds isn’t something I’d call ‘good eats’ – so immediately ruled out for what I wanted in a cup of coffee.
Aerobie Aeropress

Source: Aeropress Canada
The Aerobie Aeropress is an interesting coffee maker that purports to make a strong, espresso “like” cup of coffee in about 30 seconds. It’s cheap, around $35 and comes 200 filters. It’s similar to a french press where you pour water over your grounds except you stir and let it sit for 30 seconds before plunging the mixture through a paper filter. You take the coffee mixture and dilute it to the strength that you want. It can be strong as an espresso, or you can create an Americano. The coffee is very clean, almost too clean as the process removes much of the acidity. There are two methods of using this type of coffee maker: the traditional method which is outlined in the manual, but my best success was using the the the inverted method.
Discovered at the 2010 World Aeropress Championship by Marie Hagemeister, you prepare the coffee with the device upside down. Using Slightly more water and a longer sitting time before quickly uprighting it quickly and plunging. There is definitely an improvement in taste and body.
Overall, it makes a pretty darn good cup and tastes much better than the Keurig at a similar brewing time. The only drawback is that I find it fussy. For some reason it feels like a production as I assemble the pieces, attempt to get the plunger in place as the coffee is dripping out the bottom… it wasn’t something I wanted to use daily. Maybe a backup.
Coffee Drippers / Pour Overs
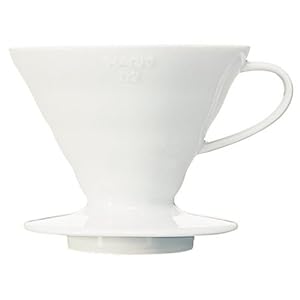
Hario V60 Coffee Dripper (source: Amazon)
After the Aeropress, I began investigating coffee dripers. These devices give you control over how much time your coffee grounds are soaking in water. I couldn’t believe how popular they were and the different styles that were available! It seems that drippers are part art and part of an expression of how serious you were with making coffee. Most of them operate the same. Place it on top of your mug, put a filter inside, rinse it, add your beans and slowly pour your water is a circular pattern. Control over the pour is vital as it cause the water to just rush out the bottom and you’ll end up with a crappy cup of coffee.
A popular model is the Hario v60 and from watching many videos using it is an art and a science all to its own. It basically a ridged funnel with a hole at the bottom. The ridges are supposed to help create turbulence as you’re pouring water which helps make a more even brew. This device is so popular that there is even a special Hario kettle which has a small curved spout to provide you better control over the pour! Unfortunately these traditional drippers are too much work for my rush out the door in the morning so it was a no go for me. Try using one of these while getting 2 young children out the door and you’ll have a very angry spouse on your hands!
My Weapon of Choice – The Clever

The Clever (Source: Sweet Marias)
After much searching and dismay, I was rescued! I found the perfect dripper that provides the perfect combination of time, fussiness and still brews a great cup of coffee. It’s called the Clever.
What is fantastic about using this device is that there is a stopper that doesn’t release the coffee until you place it over a mug! Just drop your filter in, wet it, add your grounds then just add water! Give it a quick stir and let it set for 4 minutes. Place on top of mug and you’re all done! You can control the strength and amount of the brew by altering the grind, length of steep time and the amount of water I wish to use.
Sweet Marias has some great videos on using this dripper. It’s really the low fuss, good tasting coffee brewer at a cheap price that you can get. For around $25 it’s a great bargain.
Is This all Worth It?
For about 4 minutes of brewing time I can achieve a much better tasting cup of coffee than most pod brewers. Nothing really compares with having freshly ground, quality beans. Aroma, body and acidity is much more prevalent. The amount of additional time isn’t really a factor for my needs. Even with my Keurig, but the time I actually can sit down and drink my coffee in the morning at least 4 minutes have past. If I’m going to have to wait to actually have my morning cup of joe, I might as well make a superior cup.
Pods are all about convenience and in many cases masks poor quality coffee with different flavoring agents. If you’ve ever pulled open a pod you’ll notice that the coffee is extremely fine – it has to be to get you a cup in less than 30 seconds. For a comparison to determine how much a factor the brewer affects the taste of the coffee I pulled apart 2 of the best tasting pods that I have – Talk’n Blues from the Marley Coffee company and used the grounds in the Clever. The drink was much more flavorful and satisfying than with my Keurig – still wasn’t as fantastic compared to freshly ground coffee, but noticeably better. If you have a chance, pick up a Clever for yourself and give it a shot – perhaps you’ll just use it on weekends, but it’ll be a cup that you can sit back and enjoy.
The post The Return of Freshly Ground Coffee appeared first on iamchan.


